Part #PO695 – 1″ Diameter
-
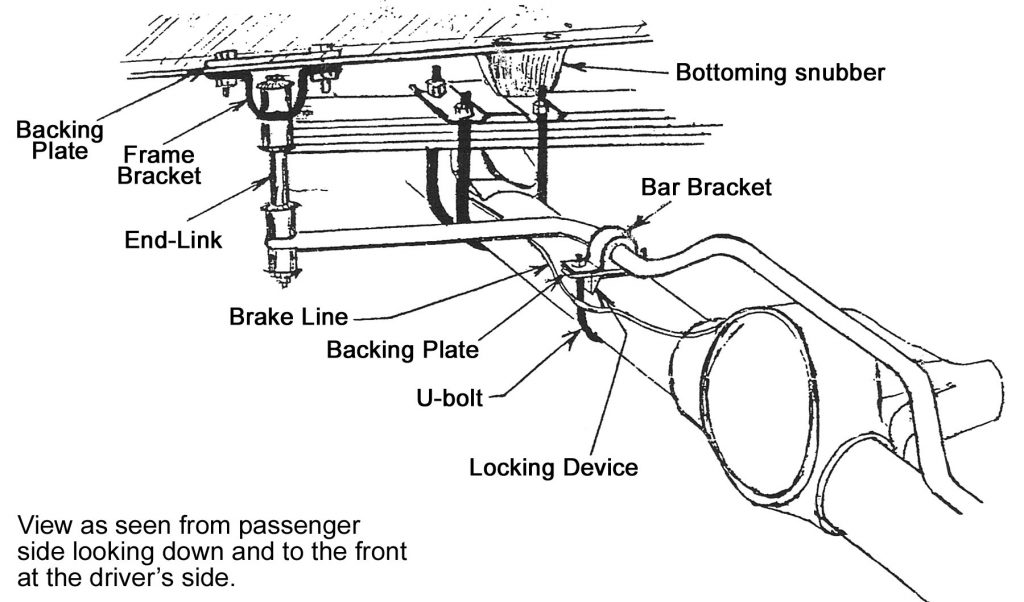
Place the bar in position on top of the axle, dip up. Arm leading to the rear. On top of the axle toward the shoulders of the bar, place the locking device and plate which will now be between the axle and the bar. Over the bar and aligning with the plates, place the bracket. Pass the large U-bolt up from below the axle, through the holes in the plate and the bar bracket and start the nuts. Be sure that the U-bolt or other parts are between the brake line and the axle so as not to crush them. Pull the brake line away from the axle slightly if needed.
-
Place the D-shaped rubber bushing on the bar mid-section and slide it under the bar bracket. Adjust the position of the brackets and U-bolts about the axle so that they give best clearance to shocks, brake line “T”, rear end breather, etc. So that they hold the bar in the most suitable position, along the top part of the axle. The bolts and bracket need not be equally spaced along the axle on the two sides. Tighten the U-bolt nuts sufficiently to keep the assembly in position during installation.
-
Assemble end-link onto bar ends. Center bolt passes through: cupped washer, rubber bushing, frame bracket (from inside bracket). Rubber bushing, cupped washer, spacer, cupped washer, rubber bushing, bar eye, rubber bushing, cupped washer, and finish with the nut. This nut should only be tight enough to keep assembly snug.
-
Raise bar arms so that the frame brackets are against frame bottom. Mark through holes in the bracket for drilling. Be sure the truck is resting on its springs when doing this. Drill holes with a 5/16” drill bit, then bolt bracket up to the frame as shown and tighten.
-
Have someone bounce the rear of the car so that you can check the clearance throughout the suspension travel distance. Tighten the nuts on the axle U-bolts to 10 ft. lbs. Check to make sure they are holding securely. Test drive the car and accustom yourself to its new handling. As we cannot supervise your installation (or driving) we cannot be responsible for more than the cost of the kit.
HARDWARE:
2 – RH 016 – END-LINKS
2 – RH 054 – BRACKETS
2 – RH 041 – BRACKETS
2 – RH 005 – U-BOLTS
4 – RH 007 – LOCK-NUTS
4 – RH 104 – WASHERS
4 – RH 031 – PLATES
4 – RH 304 – LOCK-NUT
2 – RH 043 – BRACKETS
4 – RH 200 – BOLTS
2 – RH 508 – BUSHINGS


Hello, I can’t understand how to add your blog in my rss reader
————————
my blog: http://werato.ru/